Wednesday, December 21, 2011

Unload/Uninstall Trend Micro Office Scan client 10.5


Trend Micro.svg


I wonder why to block the everything instead of trying to grow the culture for trust and reliability and ownership ? I wonder why this freaking Trend Micro's Office Scan to narrow down the accesses ?! I was ok with it untill when they locked access to my external devices which is really essential for me to back all my things up. After couple of google here is the solution I got to Unload(disable) or Uninstall Trend Micro Client where a prompt comes up for a password.

  • Go to the ..\Trend Micro\OfficeScan Client directory. Usually, it would be: 

C:\Program files\Trend Micro\Officescan Client\

  • Locate and open the Ofcscan.ini[this is the file where all the configuration setting for the OfficeScan client is stored ] file using any text editor. You may use notepad to edit. 
  • Find [INI_CLIENT_SECTION] section. 
  • Change the value of the Uninstall_Pwd to 

!CRYPT!523F7DC2E525044E2800FCDEA7E5D78B70C0A4165387060525E3EE66D5D2D2F460EA361E712B5F871FD473C7A6C
  • Change the value of the Unload_Pwd to 
!CRYPT!523F7DC2E525044E2800FCDEA7E5D78B70C0A4165387060525E3EE66D5D2D2F460EA361E712B5F871FD473C7A6C
  • Save and close the file.
  • Right click on the Officescan client on your system tray then click on Unload Officescan
  • Once it prompts you for the password type trendmicro as the password.
You should be able to see your officescan client on the system disappear. Now you are free from all the blocking imposed by this tool. I can access my external devices... o la la :D


Note: 
  • If you can't save the Ofscan.ini file [windows 7] open the editor as administrator - right mouse on the editor program and click run as administrator.
  • If Client_Allow_Uninstall / Client_Allow_Unload set to 0 make it 1.
  • If UnloadProtect is set to make it 0.


Wednesday, December 7, 2011

My Instant Continuous Integration environment for development


A simplest dev environment for continuous integration for a dev team [considering a php project with mysql db] :
1. Install Visual SVN server - its for windows and easy to install and manage SVN server.
2. Create a post commit hook for the repo; to do that - In the VisualSVN Server GUI Tool:
-Select your repository
-Right click Properties Select the Hooks tab
-Select the Post-commit hook
-Click the Edit button.
-Enter a line like this into the textbox:
c:\program files\visualsvn server\bin\svn.exe" export https://svn.yourserver.com:4433/svn/YourRepository/Websites/YourWebsite/ C:\inetpub\wwwroot\YourWebsite --quiet --non-interactive --force --username youruser --password yourpassword
-Click Ok.
3. Now for the DB Sync follow the steps in the following article : [However, you might need some modification to meet your need]
http://www.decodephp.com/2008/09/29/svn-and-mysql-schema-synchronization/

Surely, You can add more flavor to this environment, like you can add a script to run each day so that it grabs all the commit logs and emails to the test team and/or stack holders or may to the entire team - so that everybody remains better informed.

Hope this will help us a to remain synced in an Agile team.
Those who is not aware of the term Continuous Integration, you can check this wikipedia link

Sunday, November 13, 2011

Installing php driver for MongoDB

PHP      &   mongoDB


This is the post where I will configure php to work with mongoDB. On my previous post I have put the teps I followed to install mongoDB on my Ubuntu [TurnKey Linux] running on VirtualBox.
1.Run:
sudo pecl install mongo
2.Open your php.ini file and add to it:
extension=mongo.so
It is recommended to add this to the section with the other "extensions", but it will work from anywhere within the php.ini file.
3.Restart your web server (Apache, nginx, etc.) for the change to take effect.
Note:
pecl requires that pear be installed. For those using apt-get, you may need to run the following:
sudo apt-get install php5-dev php5-cli php-pear
However, you can download the source for the driver and can compile it manually :
shell> tar -xzvf mongo-1.2.6.tar.gz
shell> cd mongo-1.2.6
shell> phpize
shell> ./configure
shell> make
shell> make install
Check with the phpinfo

Starting MongoDB and php on Ubuntu

Installing MongoDB on Ubuntu:
1. Add 10gen package to source.list 
The 10gen package contains the latest mongoDB version, append below line to the end of the file “/etc/apt/sources.list
deb http://downloads-distro.mongodb.org/repo/ubuntu-upstart dist 10gen
For example, you can vim the “source.list” and append the 10gen package like this :
$ sudo vim /etc/apt/sources.list
File : /etc/apt/sources.list
#...content omitted ...
## This software is not part of Ubuntu, but is offered by third-party
## developers who want to ship their latest software.
deb http://extras.ubuntu.com/ubuntu natty main
deb-src http://extras.ubuntu.com/ubuntu natty main
 #mongo repo ##########
deb http://downloads-distro.mongodb.org/repo/ubuntu-upstart dist 10gen

 2. Update package
Update the modified “/etc/apt/sources.list” :
sudo apt-get update
Now, a new “mongodb-10gen – An object/document-oriented database” is available for install.
  3. Add GPG Key
10gen package required GPG key, import it :
sudo apt-key adv --keyserver keyserver.ubuntu.com --recv 7F0CEB10
   4. Install mongodb-10gen
Everything is ready, now you can Install the mongoDB package :
sudo apt-get install mongodb-10gen
    5. Post-InstallationVerification
Now, mongoDB is installed, started, and auto start mongoDB script is generated to “/etc/init/mongo” and “/etc/init.d/mongo“. In addition, all mongoDB files are copied to “/usr/bin” folder.

The main configuration file “mongodb.conf” is located at “/etc/mongodb.conf“, change the values to customize your mongoDB server.

File : mongodb.conf
# mongodb.conf
# Where to store the data.
# Note: if you run mongodb as a non-root user (recommended) you may
# need to create and set permissions for this directory manually,
# e.g., if the parent directory isn't mutable by the mongodb user.
dbpath=/var/lib/mongodb
#where to log
logpath=/var/log/mongodb/mongodb.log logappend=true
#port = 27017
#......
   6. Verification
To verify it, just connect it with “mongo”
$ mongo
MongoDB shell version: 1.8.1 connecting to: test
>
on my next post I will try to connect php with this mongoDB.

Friday, November 4, 2011

Parsing Email with PHP

I was working for a Email Advertisement tool,recently. And the first thing I was put to work with is to develop a parser that parses and incoming email and decides whether it is a bounced back email. After couple of googling I got some fare enough solution that I wanted to use for the solution. The steps I followed for the solution are adopted from the following :
HOWTO: Email Bounce handling with PHP, Exim & CPanel, Catch bounces from non-deliverable emails

And the very basic parser I wrote can be downloaded from the following location:
Download the email parser for bounce management
[Bascially It's a codeIgniter controller, but you can use it as you wanna use it]

However, I had to go some more details parsing, later to decide the type of bounce or the reason for the bounce.First I tried parsing the log file for the exim [exim_mainlog file] and then parsing the entire body of the bounced back emails. I will share two more posts on them in this series.

Monday, October 3, 2011

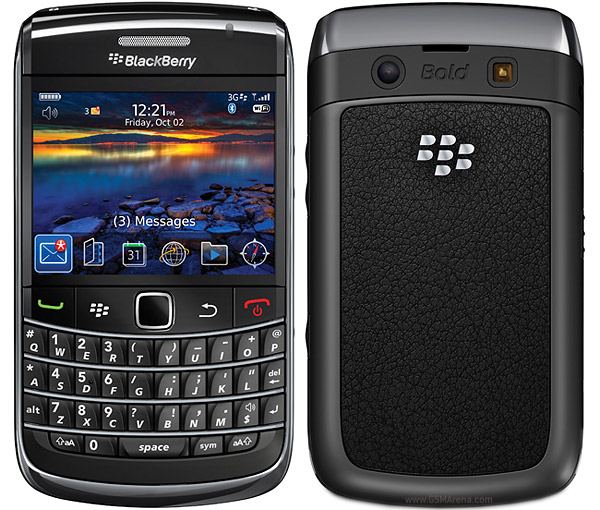
Hack a Blackberry 9700 Bold to access internet without BlackBerry data service

[I kept this post for long as Draft; thought I shud l publish; ]
Playing with the Blackberry 9700 from Sujoy who was not using it because it cost a lot to enable Blackberry service with the Operators who are offering BB services.
So I picked it up just to see why should such a device left unused just because some kinda service is not available or bcz its expensive. Following are the things what I am currently doing with it :
Setting the Internet connection without the Blackberry data service :
First of all you have to set up your tcp settings. In your BlackBerry menu go to => Options - Advanced Options - TCP and enter your APN information for your GSM Service.You can ask your customer care for the APN information.When you finish the settings you need a browser to surf the net. The best one is Opera Mini Browser. You download the Opera Browser to your BlackBerry and in the Opera Browser menu you go through automatic network setup. Once the Opera Browser finds out your settings you are ready to surf the net from you BlackBerry for free. (Excluding standart connection charges- for the GPRS/Edge from your GSM service provider)
Happy, browsing then without paying the BB service :P.

Saturday, July 2, 2011

Node.js : Simple push from server to browser

Here you go a test that a tasted while playing with Nodejs.I must say that it is a great fun playing with Nodejs.I always love to create real time environment for the web. Here is a little example of it. With this piece of code you'll be able to monitor any changes in a file in real time directly from your browser. Nothing too efficient but still a very good start. 


My flavor : On this video you will see Pedro is using a log file. Instead, I used a simple text file and updated the file manually.

Issue I faced : Din work for me on google chrome but was good on firefox. After investigation here seems a little convincing reason :
http://stackoverflow.com/questions/6068820/node-js-problems-with-response-write

For getting started with  Node.js,  You'll get a complete set of video tutorials at the following location :
http://nodetuts.com/ [the video I have shared here is the second episode from the series]

Happy Techifying the world :)    
Update: just got another example of similar push server ; utilizing socket.io.
http://www.gianlucaguarini.com/blog/?p=272

Simple Hacks for windows using regedit

Following is a list of some interesting restrictions, which can be made in Windows 2000, XP, 2003, Vista, 2008 and 7. Like you can restrict Display properties, task bar properties, folder options, etc. All tricks are based on Registry editing. So I'll tell the key name and the value, that you have to create for the restriction. If the key is not present, then simply create it.

1.) Restrict Display Properties:
HKEY_CURRENT_USER\Software\Microsoft\Windows\Current Version\Policies\System
create DWORD value NoDispCPL and set its value to 1

2.) Restrict Taskbar Properties:
HKEY_CURRENT_USER\Software\Microsoft\Windows\Current Version\Policies\Explorer
create DWORD value NoSetTaskbar and set its value to 1

3.) Restrict Folder Options:
HKEY_CURRENT_USER\Software\Microsoft\Windows\Current Version\Policies\Explorer
create DWORD value NoFolderOptions and set its value to 1

4.) Restrict Locking/Unlocking the taskbar:
HKEY_CURRENT_USER\Software\Microsoft\Windows\Current Version\Policies\Explorer
create DWORD value LockTaskbar and set its value to 1

5.) Restrict Active Desktop:
HKEY_CURRENT_USER\Software\Microsoft\Windows\Current Version\Policies\Explorer
create DWORD value NoActiveDesktop and set its value to 1

6.) Restrict adding/deleting items from Toolbars:
HKEY_CURRENT_USER\Software\Microsoft\Windows\Current Version\Policies\Explorer
create DWORD value NoToolbarCustomize and set its value to 1

7.) Restrict adding/deleting toolbars:
HKEY_CURRENT_USER\Software\Microsoft\Windows\Current Version\Policies\Explorer
create DWORD value NoBandCustomize and set its value to 1

8.) Restrict right-click in Start Menu:
HKEY_CURRENT_USER\Software\Microsoft\Windows\Current Version\Policies\Explorer
create DWORD value NoChangeStartMenu and set its value to 1

9.) Restrict Desktop Cleanup Wizard:
HKEY_CURRENT_USER\Software\Microsoft\Windows\Current Version\Policies\Explorer
create DWORD value No Desktop Clean up Wizard and set its value to 1

10.) Restrict notification at low disk space:
HKEY_CURRENT_USER\Software\Microsoft\Windows\Current Version\Policies\Explorer
create DWORD value No Low Disk Space Checks and set its value to 1

11.) Restrict Taskbar Context Menu:
HKEY_CURRENT_USER\Software\Microsoft\Windows\Current Version\Policies\Explorer
create DWORD value No Tray Context Menu and set its value to 1

12.) Restrict Programs to run:
HKEY_CURRENT_USER\Software\Microsoft\Windows\Current Version\Policies\Explorer\DisallowRun
create String value with any name, like 1 and set its value to the program's EXE file.
e.g., If you want to restrict msconfig, then create a String value 1 and set its value to msconfig.exe. If you want to restrict more programs, then simply create more String values with names 2, 3 and so on and set their values to the program's exe.

13.) Restrict Registry Editor:
HKEY_CURRENT_USER\Software\Microsoft\Windows\Current Version\Policies\System
create DWORD value Disable Registry Tools and set its value to 1

14.) Restrict Task Manager:
HKEY_CURRENT_USER\Software\Microsoft\Windows\Current Version\Policies\System
create DWORD value Disable TaskMgr and set its value to 1

15.) Restrict Writing to USB Drives:
HKEY_LOCAL_MACHINE\SYSTEM\Current Control Set\ ControlSet \Control\ Storage Device Policies
Create DWORD value Write Protect and set its value to 1

16.) Restrict New option in context menu:
HKEY_CLASSES_ROOT\Directory\Background\ shellex\ Context Menu Handlers\New
And delete the value of Default, e.g., empty it.

17.) Restrict Send To in context menu:
HKEY_CLASSES_ROOT\AllFilesystemObjects\shellex\ContextMenu Handlers\Send To
And delete the value of Default, e.g., empty it.

18.) Restrict Balloon Tips:
HKEY_CURRENT_USER\Software\Microsoft\Windows\Current Version\Explorer\Advanced
Create DWORD value EnableBalloonTips and set its value to 0

19.) Restrict Users to enable New XP StartMenu:
HKEY_CURRENT_USER\Software\Microsoft\Windows\Current Version\Policies\Explorer
Create DWORD value No Simple Start Menu and set its value to 1

20.) Restrict Command Prompt:
HKEY_CURRENT_USER\Software\Policies\Microsoft\Windows\System
Create DWORD value Disable CMD and set its value to 2

21.) Restrict Drives in My Computer:
HKEY_CURRENT_USER\Software\Microsoft\Windows\Current Version\Policies\Explorer
In right-side pane, create a new DWORD value No View On Drive and change its value as following:

3 : To Restrict A and B drives only.
4 : To Restrict C drive only.
7 : To Restrict A, B, and C drives only.
8 : To Restrict D drive only.
F : To Restrict A, B, C, and D drives only.
03FFFFFF : To Restrict all drives.

And if you want more specific restrictions, like you want to restrict a combination of other drives, then you can use decimal no. instead of hexadecimal no. Following is a list for all drives decimal no.:

A: 1
B: 2
C: 4
D: 8
E: 16
F: 32
G: 64
H: 128
I: 256
J: 512
K: 1024
L: 2048
M: 4096
N: 8192
O: 16384
P: 32768
Q: 65536
R: 131072
S: 262144
T: 524288
U: 1048576
V: 2097152
W: 4194304
X: 8388608
Y: 16777216
Z: 33554432
ALL: 67108863

So if you want to disable a combination of drives, just sum their numbers and give the same value to NoViewOnDrive. e.g., for restricting C, D, E and F drives, give the value: 4+8+16+32 = 60
NOTE: You can also hide the drives using No Drives DWORD value. The location and its value remain same as the above trick.

22.) Restrict RUN in New XP Start Menu:
HKEY_CURRENT_USER\Software\Microsoft\Windows\Current Version\Policies\Explorer
Create DWORD value No Run and set its value to 1

23.) Restrict Control Panel:
HKEY_CURRENT_USER\Software\Microsoft\Windows\Current Version\Policies\Explorer
Create DWORD value No Control Panel and set its value to 1

NOTE: If you want to remove the restriction, then simply delete the DWORD value or set its value to 0
So, that's some simple hacks that you can try to fight the battle against any virus, worms, trojan horse, malware or spyware or even your naive system admin :P Have fun :) .

Thursday, June 23, 2011

Fun with SAPI

Following vb script pronounces what you write- I tried on my win7 box and I thought it's fun to get started with SAPI. Write the code on Notepad and save the file with extension .vbs.

Then clicking the vb script file will show you the following window - write what you want to listen on the text box and press ok, did you hear that ? :P

I have some more idea based on it; do you ? Will share once I can create some more fun with it :)

Resources for Face Detection

I always had some interest in working with faces :B - yeah face detection and recognition. following is a list I have found once on the internet; thought might be helpful for me someday when I'll get some time to work with seriously :S.
Face detection (or more generally Image Matching resources):
AForge.net
Facedectection in C# with less than 50 LoC
http://friism.com/facedectection-in-c-with-less-than-50-loc
Face Detection in (pure) C#
http://askernest.com/archive/2008/05/03/face-detection-in-c.aspx
Easy to use Wrapper (DLL) for Intel’s OpenCV Library with Examples
http://www.codeproject.com/KB/cs/Intel_OpenCV.aspx
OpenCV (Open Source Computer Vision) for C#
http://coolthingoftheday.blogspot.com/2008/08/opencv-open-source-computer-vision-for.html
OpenCVDotNet
http://code.google.com/p/opencvdotnet/
Emgu CV
http://www.emgu.com/wiki/index.php/Main_Page
SharperCV Project
http://www.cs.ru.ac.za/research/groups/SharperCV/
[C#] OpenCV
http://www.dotblogs.com.tw/chou/archive/2009/06/13/8812.aspx
Webcam in C#: with OpenCVDotNet
http://haryoktav.wordpress.com/2008/12/12/webcam-in-c/
OpenCV / SURF How to generate a image hash / fingerprint / signature out of the descriptors?
http://stackoverflow.com/questions/2146542/opencv-surf-how-to-generate-a-image-hash-fingerprint-signature-out-of-the-d
Face Detection and Identification
http://www.emgu.com/forum/viewtopic.php?f=7&t=11&start=10
Phase Correlation in OpenCV
http://nashruddin.com/phase-correlation-function-in-opencv.html
SURF and OpenSURF
http://amitsarangi.wordpress.com/tag/opencv-features/

A proprietary tool but had a lot of fun with the following tool:
http://www.luxand.com/